
Read the project report paper in PDF.
The ocean is a mysterious world that is not easy to reach. However, people have a curiosity about this strange deep world and would like to know what kind of marine creatures live in the deep ocean, especially children. Also, we are not satisfied by the traditional study experience, like just looking at pictures, to get to know the sea animals. Instead, we want to make the learning process more interesting and more interactive. Using motion capture technology, we developed an interactive marine-life education system for children to enhance the experience for them to learn different kinds of sea animals.
And we called it “Marine World”.
Marine World is an interactive multimedia system based on motion capture technology. It’s used to help children learn about the different types of sea life that live in all parts of the sea. In the installment, you walk on a virtual water pool that creates ripples wherever you step. In the water, there are sketches of different types of sea life, and if you stand over them, interesting facts about that animal appear on the wall display in front of you. Hopefully, by doing this process in the different “levels” of the sea, you might learn something new.
For this project, we used three computers, two programming languages and a motion capture system.
Motive: Motion Capture System
We’re using a motion capture system called Motive by Optitrack. This is the heart of our program and also the place we get the data from. Basically, it can track the user’s movement in 3D space in the specified motion capture area. Motive can get your X and Z-axis location on the floor, and your height, which is the Y-axis. The location capture result should be different depending on how the system was calibrated, but don’t worry, we already did the initial wanding and calibration and saved as a project file on the corresponding computer, so you just need to launch and run the file.
Set up the Mocap System
To getting started, first you need to switch on the Motive hardware on the computer controlling the mocap system (hereinafter referred to as “computer 0”). Next, just open the project file “Marine World”, and the Motive software will be launched, as well as these mocap cameras. You also need to click on the shortcut “Change IP address”, which is a text file to change the IP address of your laptop that connected to the projector on the floor, which I will talk about that later. Finally, you need to open the shortcut “Send mocap data”, which is an executable file to send the mocap data to your laptop.
You might ask, how this mocap system track me? The Motive system can track the location of a “rigid body”. We are using a rigid body with 3 markers. The mocap camera will detect this rigid body and get its location in the mocap area. Wear this on your left or right foot. Now you are ready for the mocap system.
Max: Control Panel (User Interface)
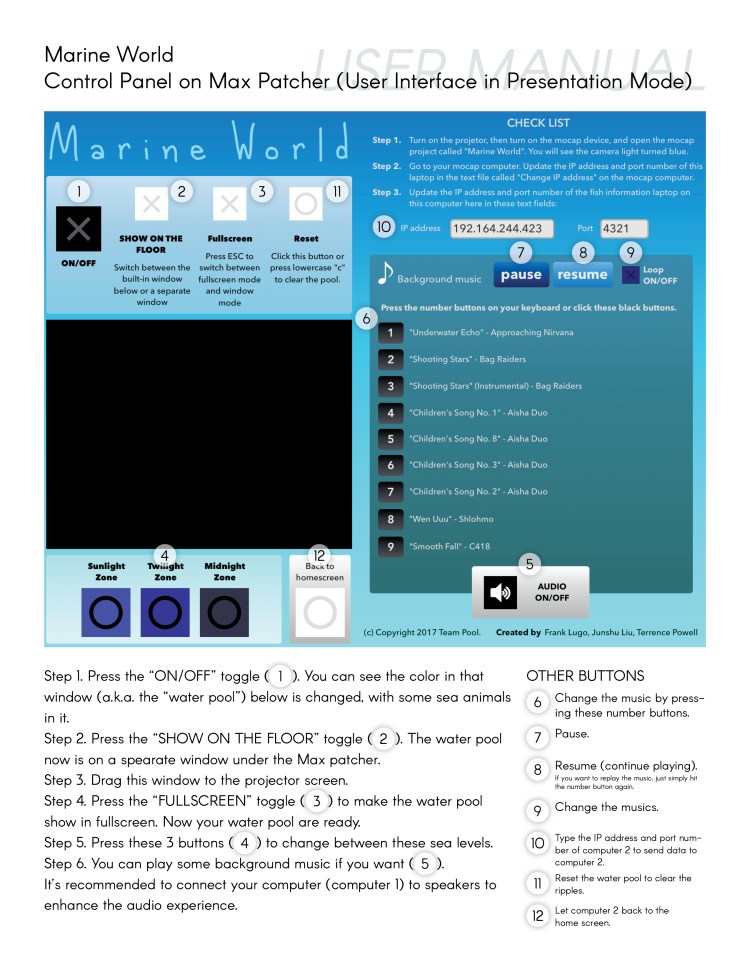
The second computer (hereinafter referred to as “computer 1”) is responsible for the user interface of the control panel and the water pool effect, which is programmed by using Max, a programming language by Cycling ‘74, and we called a Max program file a “patch” or a “patcher”. You should connect computer 1 to the projector projecting to the floor. Then, open the file that also called “Marine World”. After opening this patch, you will see this screen:

This is our user interface which looks beautiful and simple to use.
You can also read and download a PDF version of this user manual.
Here you go! you have a giant water pool now.
Max: Water Pool on the floor
Now, with the rigid body attached to one of your shoes, you can go into the “water pool”. And you can see, a “water ripple” appears right under your foot while you are walking. Congratulations! you are able to walk on water.
pool.maxpat
Max comes with a sample patch called “pool.maxpat”. This is a simple patch that you can use the mouse to click on this window to make ripples. When the mouse clicked in this window, an output “1” will be returned. It is a 160 * 120 window with a gray background. The file is located at ~/Max 7/Examples/jitter-examples/others/pool.maxpat.
For our project, first, we changed the input from the mouse to the scaled mocap data, while we kept the mouse input for debugging with these switches. In the patch, we’re using the method “udpreceive” to receive the data sent from the motive system. Then, we changed the resolution of the pool window from 160 * 120 to 640 * 480, which looks more beautiful and less pixelated on the projector. Then, we changed the color of the pool. You can change 3 colors for 3 different sea levels – sunlight zone, twilight zone, and midnight zone, as well as those different type of sea animals in each sea level. You can simply press the buttons in the control panel to switch between these sea levels. You can see the water pool on the floor is changing, not only the colors but also the sea animals in particular sea level.
Location Mapping
As part of the mocap calibration process, we set the ground plane, which determines the location value on the upper-left corner of the projecting area. Wherever the ground plane is placed determines where your X and Z coordinates are (0,0), we then used the scale method to scale from the mocap location data to the projector’s resolution, which is 640 * 480.
We used the height value in order to make the ripple effect. For the height, we designed to make ripple effect happens when the user is walking on the floor in the projecting area by slightly increasing their foot’s height. Also, if the foot is already on the floor, the ripple effect should not appear. I tested this height and made an if statement that if the height is in the area that is slightly higher than the floor but lower than the height that your foot is rose when you are walking, which is between 90 and 100, an output “1” will be returned, as same as the value when we testing the code using the mouse input.
Making sea animal pictures
In addition, we found a lot of pictures of the sketches of these creatures on the Internet, and used Photoshop and Illustrator to make those as white stroke color with transparent backgrounds, and made three 640 * 480 pictures also with transparent backgrounds for different sea levels. Finally, I used the method “op” with “+” operation to add the pool and the fish together. Now our water pool is completed.
Processing: Marine-life information on the wall
Now that the sea creatures are under our feet, we’d still like to know what they are!
First, you’ll want to make sure you have another computer (“computer 2
) connected to a projector that displays on a wall. We also used Processing, which is a programming language for visual arts. Then, open the Processing file “Marine World”, press the “run” button, and your display will go fullscreen. On the wall, you’ll see the same color being projected as on the floor. Now, if you stand on any of the sketches of animals, a better picture will appear on the wall, and you can get to know the sea animal that is just under your foot.
How does the processing program knows where these animals are in this pool? On the Max patch, we used the mouse to check where these things located in this 640 * 480 pool.
In order to map out these animals, we obtained the X and Z coordinates of each of these animals from the Max patch, and then placed the maximum and minimum coordinate for each of them in the processing program. We did this by assigning an if statement to each sea animal. Each if the statement contains the sea animal’s corresponding max and min coordinate.
Also, if you change the sea level by pressing the buttons in the Max UI, the processing program will follow suit and change to the same sea level to match the color and the information for the particular sea animal that was stepped on.
The processing code is receiving the location data sent from the Max patch, this includes the scaled X, Y, and Z values, as well as the sea level information. The processing program is receiving the data using the format “ifffi”, which represents an integer, four floats and an integer that represents the “the rigid body number, the scaled X value, Y value, Z value, and the sea levels”. In the Max patch, we used the “pack” method to pack these 5 values into one banging message and used the method “udpsend” object to send this output to the processing program on that laptop. As you can see, the laptop’s IP address is needed for sending and receive values.
Notes
- Be sure that all the computers are connected to the same network.
- The IP address of computer 2 that running the processing program needs to be updated on computer 1 that running the Max patch if the IP address happens to be changed by something such as a reboot or network reconnection.
- Also for computer 0 that stores the IP address of computer 1.
- And tape the rigid body tightly so that it won’t fall off.
Enjoy this interactive education system, kids! By the way, don’t try drinking that water, or the fish will kill you.
Behind this project: about the course
This is the final project of the AME 320: Motion Capture Integrative System course by professor Qiao Wang from School of Arts, Media and Engineering at ASU.
In this course, students are intended to
- Learn to use the motion-capture system, Motive, by OptiTrack.
- Build interactive media system using Motive, Max/MSP, and Processing.
We had lectures at ASU’s Digital Art Ranch (DAR), which offers a lot of hardware for building interactive media systems, including Motive.
Copyright © 2017 Junshu Liu, Terrence Powell, Frank Lugo, Qiao Wang. All rights reserved.
You can read and download a PDF version of this instruction document (also our final project report paper).
POSTED May 2, 2017
UPDATED January 18, 2018
